This chapter helps you getting started after you have successfully installed Planetarium on your Palm. It shows you how to enter your location and gives you a short explanation of the two main views.
Entering the location
In order to calculate the sky for your place, you first need to enter the coordinates of your location. Select the menu item "Options / Set Location" or tap on the location text at the lower left to get to the Location screen.
The Location screen is divided in an upper and a lower part.
 In the upper part you enter the time zone your Palm's clock is currently set to. Planetarium uses this entry to calculate UTC (Universal Time Coordinated, the time in Greenwich) which is the base for calculating astronomical events. Example: If you live in San Francisco and your Palm is set to Pacific Time, set this entry to GMT-8. If you travel to New York and adjust your Palm's clock to Eastern Time, change this entry to GMT-5, always keep it according to the time zone your Palm's clock is set to. In the upper part you enter the time zone your Palm's clock is currently set to. Planetarium uses this entry to calculate UTC (Universal Time Coordinated, the time in Greenwich) which is the base for calculating astronomical events. Example: If you live in San Francisco and your Palm is set to Pacific Time, set this entry to GMT-8. If you travel to New York and adjust your Palm's clock to Eastern Time, change this entry to GMT-5, always keep it according to the time zone your Palm's clock is set to.
The Daylight Saving Time (DST) switch adds one hour to the time zone. Check this box during summer when you observe daylight saving time and uncheck it during winter. Please note: Planetarium can not automatically calculate the transition dates for DST, so you need check and uncheck this switch manually every time you adjust your Palm's clock to summer or winter time.
In the lower half you set the location you want Planetarium to calculate the sky for. Look up the coordinates in an atlas or on the web or tap on the "Pick" button to choose a location from the list. You also enter the time zone of that location. Planetarium uses this value to calculate events like sun rise for example in local time for that location. The DST switch works the same as above, check it if the specified location currently has daylight saving time in effect, uncheck it otherwise.
Are you confused with the two time zone settings? Don't worry. If you use Planetarium to calculate the sky for the place you currently are and you have set the Palm clock to the time zone of your current location, these two entries are the same. Example: If you live in San Francisco and have set your Palm's clock to Pacific Time, set both entries to GMT-8. Check or uncheck both DST switched according to the season. Then you need to enter latitude and longitude of San Francisco and you're set.
back to the top of the page
|
Compass view
 Now select the menu item "Options / Compass view" to get to compass view. Now select the menu item "Options / Compass view" to get to compass view.
Make sure the "Now" button  is active (white clock on dark background). When the "Now" button is active, Planetarium uses the current time from the Palm's clock. is active (white clock on dark background). When the "Now" button is active, Planetarium uses the current time from the Palm's clock.
In Compass view, the information for celestial objects is given in azimuth (the horizontal angle between north and the direction of the object, counted eastwards) and altitude (the vertical angle between the horizon and the height of the object). Azimuth is measured in degrees, counted eastwards. Altitude is also measured in degrees, 0° is at the horizon, 90° is at the zenith. Negative values are below horizon.
|
 These two values are shown graphically. The circle at the right of the display shows the azimuth of the objects on a compass scale. To use this dial, turn the Palm Organizer so that 'N' points to the north. (If you don't know where north is, try to turn the Palm so that the Sun or the Moon icon points to the Sun or to the Moon. During the night you could also try to find Polaris if you are in the northern hemisphere). These two values are shown graphically. The circle at the right of the display shows the azimuth of the objects on a compass scale. To use this dial, turn the Palm Organizer so that 'N' points to the north. (If you don't know where north is, try to turn the Palm so that the Sun or the Moon icon points to the Sun or to the Moon. During the night you could also try to find Polaris if you are in the northern hemisphere).
The semicircle on the left shows the altitude. Hold your Palm Organizer upright so that 'Z' points to the zenith. Objects below the horizon line 'H' are not visible at the specified time and location.
|
| With the selector at the upper right you can choose the Sun, the Moon or a planet as the current object. The current object has lines drawn from the center and the various numbers are data for the current object. You can also select any other object as the current object by tapping the button with the magnifying glass icon. |
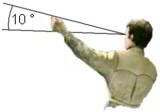
Many people find it difficult to estimate the altitude of an object on the sky. This is a simple trick to improve these estimates. |
 Example: Example:
In this example you can see in the left semicircle that Jupiter and Saturn are well above the horizon. In the right circle you find their direction: Jupiter is southeast and Saturn is in eastern direction. The Moon is in western direction and therefore about to set. In the left display we find that it has just crossed the horizon.
|
back to the top of the page
|
Sky view
Now change to Sky view by tapping the  button or selecting "Options / Sky View" from the menu. The sky view shows a camera-like image of the sky with the stars and planets as it can be seen at the specified location and time. button or selecting "Options / Sky View" from the menu. The sky view shows a camera-like image of the sky with the stars and planets as it can be seen at the specified location and time.
|
 This picture shows the sky for the same place and the same time as above when looking in shoutheastern direction. The line marks the horizon. The display covers a field of view of about 90°. This picture shows the sky for the same place and the same time as above when looking in shoutheastern direction. The line marks the horizon. The display covers a field of view of about 90°.
The two dials at the lower right indicate the view direction. The principle behind them is the same as in Compass view: The left semicircle shows the altitude of the center of the sky map, the right circle shows the azimuth. You can tap on them to quickly set the view direction.
You can use the pen to tap on any object to select it and show its name. The selected object will be marked with a crosshair and information about it will be displayed on the bottom lines.
If you drag the pen to move the sky map: Place the pen somewhere on the display and move it a little. The crosshair will change to a four arrows symbol. Then drag the pen where you want to move your starting point to and lift it.
|
 Sky view also has a "Now" button: The leftmost button Sky view also has a "Now" button: The leftmost button  on the tool bar just below the title bar. on the tool bar just below the title bar.
The Info button  only appears when an object is selected. It will show an information page about the object. only appears when an object is selected. It will show an information page about the object.
To search for an object tap on the Find button 
The Settings button  leads you to the Sky View Settings screen where you can specify what you want to see in the sky map. leads you to the Sky View Settings screen where you can specify what you want to see in the sky map.
The  button brings you back to compass view. button brings you back to compass view.
|
 You can zoom in and out with the pull down list at the upper right The number indicates the size of the field of vision. You can zoom in and out with the pull down list at the upper right The number indicates the size of the field of vision.
You can use graffiti strokes to set the view direction quickly:
Write "N","E","S" or "W" to select north, east, south or west.
Write "0", "1", ..., "9" to select an altitude of 0°, 10°, ..., 90°.
|
back to the top of the page
Twilight
 Select the menu item "Options / Twilight" to get to the twilight screen. Select the menu item "Options / Twilight" to get to the twilight screen.
The twilight screen shows:
- Sun rise and set
- Moon rise and set
- Twilight times
Civil, Nautical and Astronomical twilight are defined as the times when the Sun is 6°, 12° and 18° below the horizon respectively. Roughly speaking,
- Civil twilight is when it's getting dark somewhat and you should switch on the lights of your car.
- Nautical twilight is when it gets dark enough for the brightest stars to be visible in the sky, which was important for nautical purposes, hence the name.
- Astronomical twilight is when it gets dark enough to observe even the faintest objects.
Now you have completed your first steps with Planetarium. To learn more about the capabilities of the program, please read the other chapters of the manual.
back to the top of the page
User Manual Contents
|